
How To
How to Write a Check: A Step-by-Step Guide to Mastering This Essential Skill
In today’s digital age, where online banking and mobile payments dominate, writing a check might seem like a relic of the past. However, checks remain a reliable and widely accepted form of payment for many transactions, from rent payments to charitable donations. Knowing how to write a check is an essential skill that can come in handy when electronic payment methods aren’t an option. Whether you’re a first-time check writer or need a refresher, this comprehensive guide will walk you through the process step by step.
Why Learning How to Write a Check Still Matters
Before diving into the specifics of how to write a check, it’s important to understand why this skill is still relevant. Checks are often required for certain transactions, such as paying rent, making large purchases, or sending money through the mail. Additionally, writing a check can help you keep a tangible record of your payments, which can be useful for budgeting and financial tracking.
Moreover, checks are a secure way to transfer funds, as they require your signature and bank authorization. By learning how to write a check correctly, you can avoid common mistakes that might lead to payment delays or even fraud.
Step 1: Gather the Necessary Materials
To write a check, you’ll need a few basic items:
- A Checkbook: Ensure you have a checkbook issued by your bank. If you don’t have one, contact your bank to order checks.
- A Pen: Always use a pen with permanent ink (preferably blue or black) to prevent alterations.
- Accurate Information: Have the recipient’s name, the payment amount, and the date ready.
Step 2: Date the Check
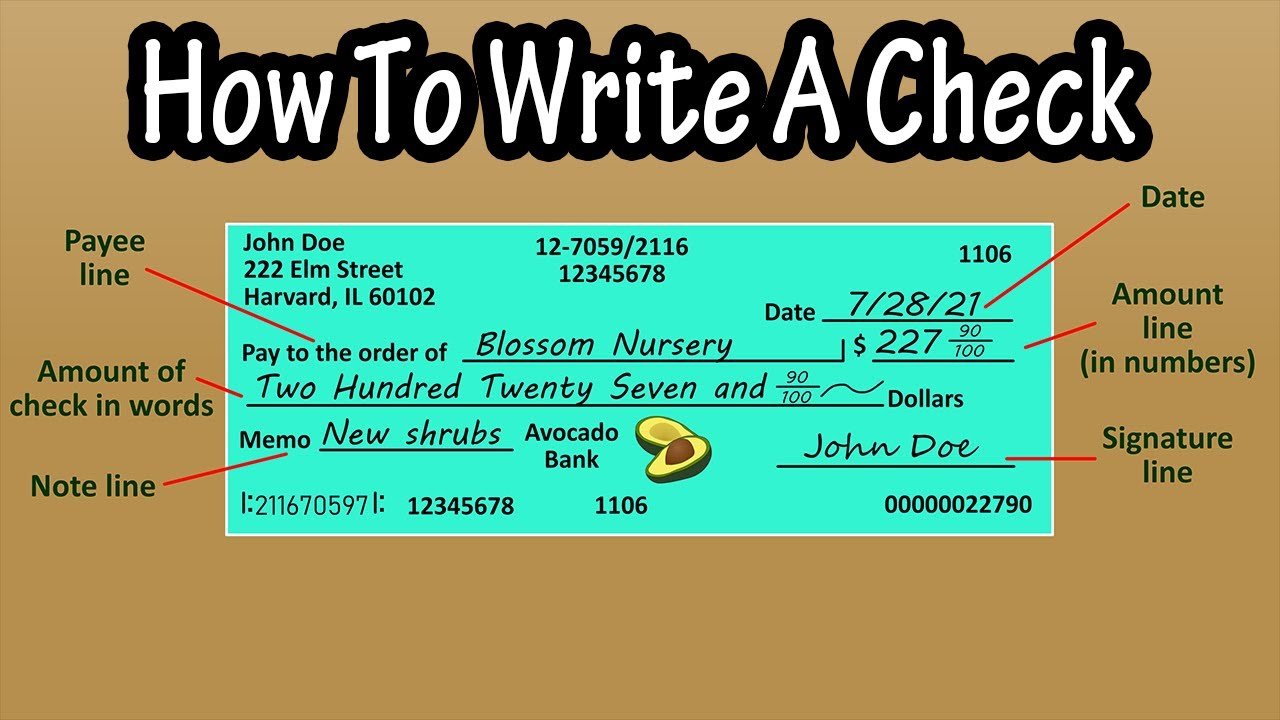
The first step in learning how to write a check is dating it correctly. In the top right-hand corner of the check, you’ll see a line labeled “Date.” Write the current date here, using the format MM/DD/YYYY.
Dating a check is crucial because it determines when the funds can be withdrawn. If you postdate a check (write a future date), the recipient won’t be able to cash it until that date arrives. However, be cautious with postdating, as some banks may still process the check early.
Step 3: Write the Payee’s Name
On the line that says “Pay to the Order of,” write the name of the person or organization you’re paying. This is known as the payee. Be sure to use the full, correct name to avoid any confusion. For example, if you’re paying a company, use its official name rather than a nickname or abbreviation.
If you’re unsure of the payee’s name, ask for clarification. Writing the wrong name could result in the check being rejected or deposited into the wrong account.
Step 4: Write the Payment Amount in Numerals
In the box on the right-hand side of the check, write the payment amount in numerals. For example, if you’re paying $125.50, write “125.50.” Be sure to include the decimal point and two digits after it, even if the amount is a whole number (e.g., “125.00”).
Writing the amount clearly and accurately is a critical part of how to write a check. Any discrepancies between the numerical and written amounts could cause issues when the check is processed.
Step 5: Write the Payment Amount in Words
Below the payee’s name, you’ll see a line that says “Dollars.” Here, write out the payment amount in words. For example, if you’re paying $125.50, write “One hundred twenty-five and 50/100.”
If the amount includes cents, write it as a fraction over 100 (e.g., “50/100”). If the amount is a whole number, you can add “and 00/100” for clarity. This step ensures that there’s no confusion about the payment amount.
Step 6: Add a Memo (Optional)
In the bottom left-hand corner of the check, you’ll see a line labeled “Memo” or “For.” This space is optional but can be useful for noting the purpose of the payment. For example, you might write “Rent for October” or “Birthday Gift.”
Including a memo can help both you and the recipient keep track of the transaction. It’s especially helpful for business payments or recurring expenses.
Step 7: Sign the Check
The final step in how to write a check is signing it. In the bottom right-hand corner, you’ll see a line labeled “Signature.” Sign your name exactly as it appears on the signature card your bank has on file.
Your signature authorizes the bank to release the funds, so never sign a blank check. If the check isn’t signed, it won’t be valid, and the recipient won’t be able to cash or deposit it.
Common Mistakes to Avoid When Writing a Check
Even after learning how to write a check, it’s easy to make mistakes. Here are some common errors to watch out for:
- Incorrect Dates: Writing the wrong date can cause confusion or delay the payment.
- Mismatched Amounts: Ensure the numerical and written amounts match exactly.
- Illegible Handwriting: Write clearly to avoid misinterpretation.
- Missing Signature: A check without a signature is invalid.
- Using Pencil: Always use a pen to prevent alterations.
How to Void a Check

Sometimes, you might need to void a check, either because you made a mistake or no longer need to use it. To void a check, write “VOID” in large letters across the front of the check. This ensures that the check cannot be cashed or deposited.
Voiding a check is a useful skill to know, especially if you’re setting up direct deposit or automatic payments and need to provide a voided check as proof of your bank account information.
Tips for Keeping Your Checks Secure
Writing a check involves sharing sensitive banking information, so it’s important to take steps to protect yourself from fraud. Here are some tips:
- Store Checks Safely: Keep your checkbook in a secure location.
- Monitor Your Account: Regularly review your bank statements for unauthorized transactions.
- Use Secure Mail: If mailing a check, consider using certified mail or a secure drop box.
- Shred Old Checks: Dispose of canceled or unused checks by shredding them.
Conclusion: Mastering the Art of How to Write a Check
While digital payment methods are convenient, knowing how to write a check is a valuable skill that can serve you well in various situations. From paying bills to making donations, checks remain a trusted and reliable form of payment. By following the steps outlined in this guide, you can write checks with confidence and avoid common pitfalls.
Remember, accuracy and attention to detail are key when writing a check. Double-check the date, payee, and payment amounts before signing, and always keep your checks secure. With practice, writing a check will become second nature, ensuring you’re prepared for any financial situation that comes your way.
you may also read

Exploring PCBA Solutions and the Advantages of Blue Circuit Boards in Modern Electronics

How to Keep Your Basement Liveable: Tips for a Comfortable and Functional Space

How Branded Merchandise Boosts Business Visibility

Making Money on Telegram: Best Subscription Business Model in 2025

OPPO Find N5: Enhancing Urban Life

Making the Most of Your Marketing Budget in 2025: Digital Strategies That Deliver Bigger Results

Sweet Expressions: Why Chocolate Remains the Ultimate Gift for Women

Baroque Beauties: Prague Castle and Schönbrunn Palace

Innovative Escapes: Exploring the World’s Most Unique Theme Parks

Sweet Escapades: Europe’s Legendary Desserts

How to Create a Successful Crowdfunding Campaign Video

Elevate Your Summer Wardrobe with These Stylish Cardigan Looks

Binary Options Broker Selection Made Easy

Castle App Free Download — Updated 2024 Version

10 Best Fake ID Websites 2025

Private Proxies for Secure and Anonymous Online Activities

How to Write a Check: A Step-by-Step Guide to Mastering This Essential Skill

How to get a duplicate RC book for your vehicle: A step-by-step guide

Harry Bring: A Name Synonymous with Excellence and Innovation

Get More Facebook Followers Instantly!
Exploring PCBA Solutions and the Advantages of Blue Circuit Boards in Modern Electronics
How to Keep Your Basement Liveable: Tips for a Comfortable and Functional Space
How Branded Merchandise Boosts Business Visibility
Making Money on Telegram: Best Subscription Business Model in 2025
OPPO Find N5: Enhancing Urban Life
Making the Most of Your Marketing Budget in 2025: Digital Strategies That Deliver Bigger Results
Sweet Expressions: Why Chocolate Remains the Ultimate Gift for Women
Baroque Beauties: Prague Castle and Schönbrunn Palace
Innovative Escapes: Exploring the World’s Most Unique Theme Parks