News
How to Build Hip Mobility Safely

“], “filter”: { “nextExceptions”: “img, blockquote, div”, “nextContainsExceptions”: “img, blockquote”} }”>
Get access to everything we publish when you
>”,”name”:”in-content-cta”,”type”:”link”}}”>sign up for Outside+.
Good hip mobility comes with a host of benefits, and thanks to the rise of mobility-focused influencers on social media, our feeds can make it seem like anyone can achieve deep squats or even do the splits with the right drills and practice. But as with any athletic endeavor, we all have unique abilities and limitations when it comes to mobility.
One of the main reasons so many athletes emphasize mobility training is its role in injury prevention. Hip mobility, in particular, is crucial because tight hip flexor muscles can also lead to misalignment and pain in the lower back and knees. And if you tend to sit down for much of the day, you’re at an even greater risk of hip tightness thanks to the shortened position of your hip flexors while you’re seated.
But blindly aiming for a lofty hip-related mobility goal that works for someone else can lead to low-back injuries, sacroiliac dysfunctions where the lower back and hips connect, and even hip labral tears if you push past your individual limits.
Steer clear of these preventable injuries by taking a moment to understand why the hips have mobility limits, and how to respect your own.
RELATED: 13 Cross Training Exercises Runners Can Do At Home
Why Hip Mobility Drills Are Not One-Size-Fits-All
The hip is a complex structure that includes pelvic bones, the thigh bone, cartilage called a labrum, joint capsules, muscles, fascia, nerves, and blood vessels. A movement restriction in any of these structures can limit mobility.
Many athletes don’t become aware of possible bony limitations until they feel their hip mobility plateau despite consistently working at it. Pelvic and thigh bone shapes vary by individual, and this structural variation is why some people prefer to squat down with their toes parallel while others are more comfortable squatting with their feet pointing outward, for example.
Certain exercises can help increase your range of motion, but exercise can’t change your bone structure. Forcing progress with a plan that doesn’t suit you can lead to injuries.
The good news is that unless you have an injury or medical issue, you don’t need to invest in X-rays and MRIs to individualize your hip mobility plan. Instead, use the following two movements to discover your own hip mobility opportunities and boundaries.
2 Hip Mobility Assessments to Find Your Limits
You can individualize your hip mobility plan with two simple self-assessments. If you feel limited movement, pay close attention to where the restriction stems from. Your senses will help you decode your next steps.
As with any exercise, if you feel a stuck or painful region, gradually back out of the movement instead of trying to push through it.
Assessment 1: FABER
FABER stands for flexion, abduction, and external rotation, which are the anatomical motions of the hip. The FABER position looks like a figure four lying on your back.

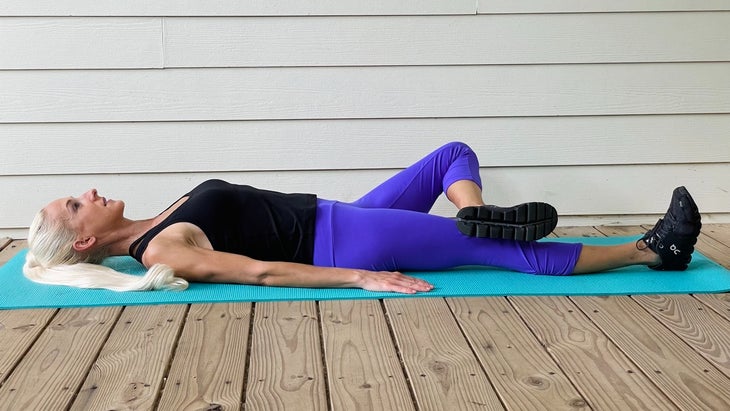
How to do it: Lie flat on your back, keeping your left leg straight and relaxed on the floor. Bend your right knee and place your right foot on the outside of your left leg, just above knee height. Allow your right knee to open to the side, as if you were doing a one-sided butterfly stretch while lying on your back. Use your right hand to apply a very gentle downward force on your right thigh. Repeat on the other side.
Signs of movement limitation: If you feel gentle pulling along the length of the inner thigh, your body is telling you to stretch your hip adductors. Consider either the seated or face-up butterfly stretch, or banded quad rocks:
Butterfly Stretch

Sit on the floor or a mat with the soles of your feet together, maintaining good posture with a neutral spine. Let your knees fall out to the side. If you prefer a deeper stretch, move your feet closer to your body while maintaining good posture.
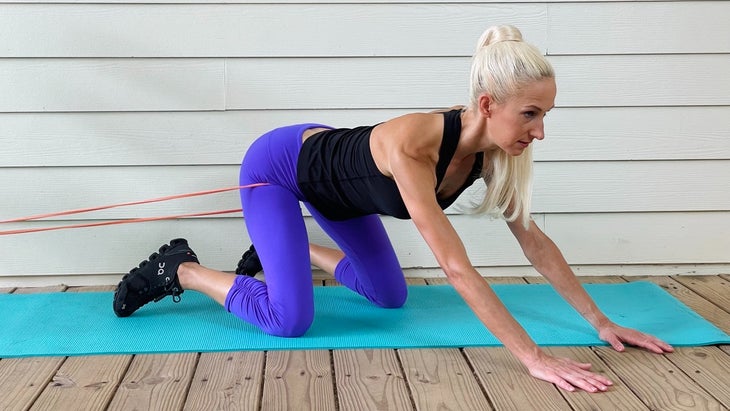
Banded Quad Rock
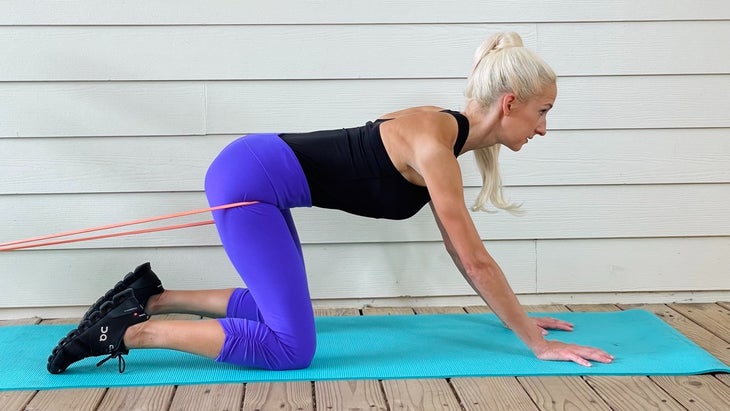
Anchor a resistance band to a sturdy point close to the floor, then place it around your hips while facing away from the anchor point. Set up on all fours, then gently rock forward and back while keeping your spine neutral, or hold the position at any point where you feel a release in the target muscle.
If you feel pain or stiffness localizing to the groin during the FABER assessment, your body is telling you that your hip needs to learn to glide down and back within its socket. Helpful mobility drills and stretches include the banded quad rock, happy baby, and downward dog:
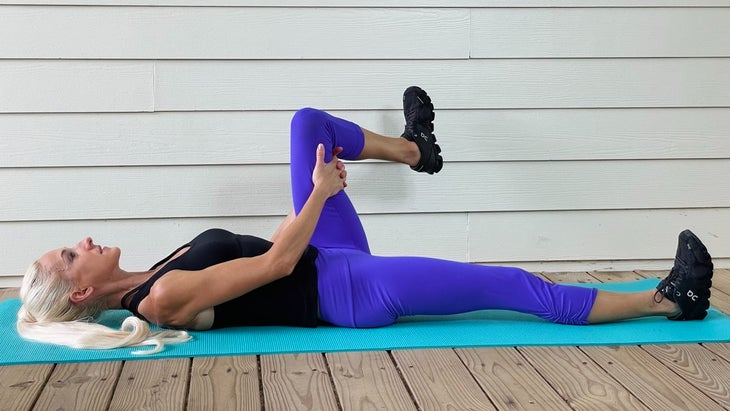
Happy Baby
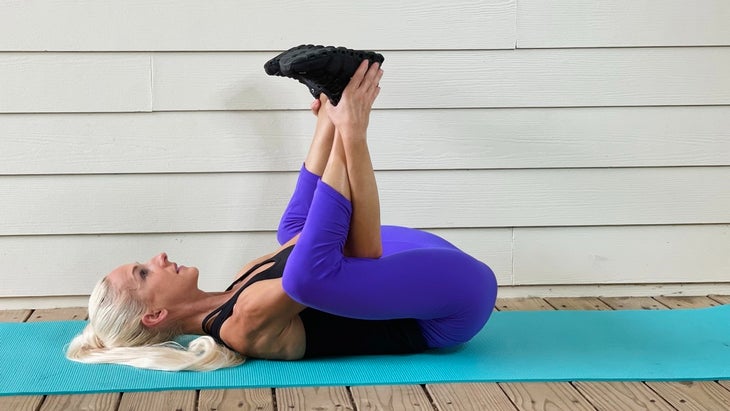
Begin lying on your back, then bring your knees toward your chest with the soles of your feet facing upward. Reach up and gently grab your feet, letting your knees fall to your sides as low as your muscles and joints are comfortable going. Rock from side to side or hold the position, whichever feels best for your hips.
Downward Dog

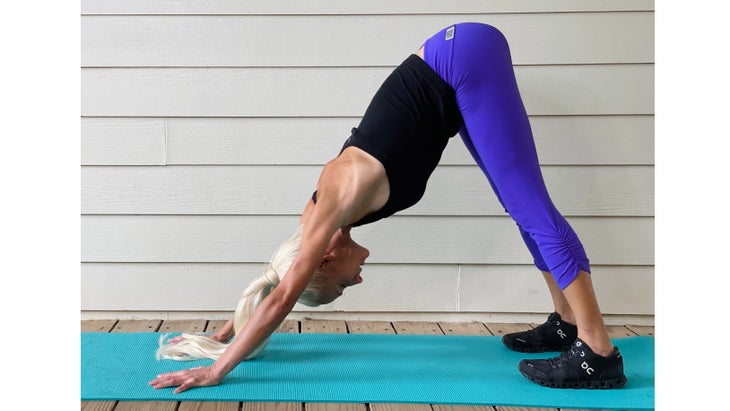
Start on your hands and knees with your hands below or slightly in front of your shoulders. Press with your hands as you lift your knees off the floor, straighten your legs, and lift your hips upward. Keep your spine neutral throughout the movement. If you prefer to make this movement more dynamic, try lifting your heels one at a time as you hold the stretch.
If you identify limitations with the FABER assessment, steer clear of drills that drive the top of the thigh bone toward the front of the hip socket. Specific drills to avoid include band-assisted hip flexor stretches and face-down stretches such as figure four, frog, and goalie butterfly.
Assessment 2: FADIR
FADIR refers to another set of motions of the hip: flexion, adduction, and internal rotation. The FADIR position looks like you’re hugging your knee toward the opposite armpit, but your foot is in an unusual position.
How to do it: Lie flat on your back, keeping your left leg straight and relaxed on the ground. Try to keep the back of your left knee area as close to the ground as you can. Bend your right knee to approximately 90 degrees, and pull your right thigh toward your chest. See if you can grasp the back of your thigh with your hands or a yoga strap. Your hip and knee should now be close to 90 degrees. Bring your thigh a bit closer if you can do so without lifting your other leg, and without rounding your low back.
Now, imagine your right knee is at the center of a clock. Your right foot is pointing at six o’clock, your left side is at nine o’clock, and your right side is at three o’clock. Keep your right knee at the center, then glide your right foot out toward three o’clock as much as you can. Maintain this rotation, then use your hands or the yoga strap to draw your right knee as close as you can to your left armpit while maintaining a neutral spine. Repeat on the other side.
Signs of movement limitation: If you feel gentle pulling around the gluteal area, your body is telling you to stretch your glutes and piriformis, another muscle in the gluteal area. Consider the figure four, seated spinal twist, or pigeon stretch:
Figure Four
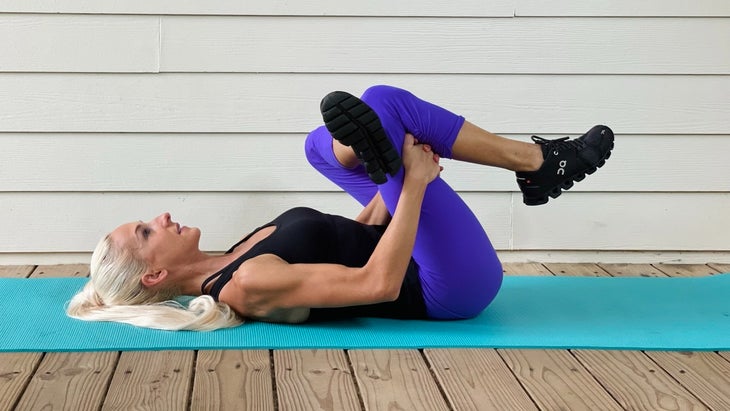
Start by lying on your back, then bend both knees until they are close to forming 90-degree angles. Place one ankle on the opposite thigh and try to gently hug your legs toward your chest while maintaining the figure-four position.
Seated Spinal Twist
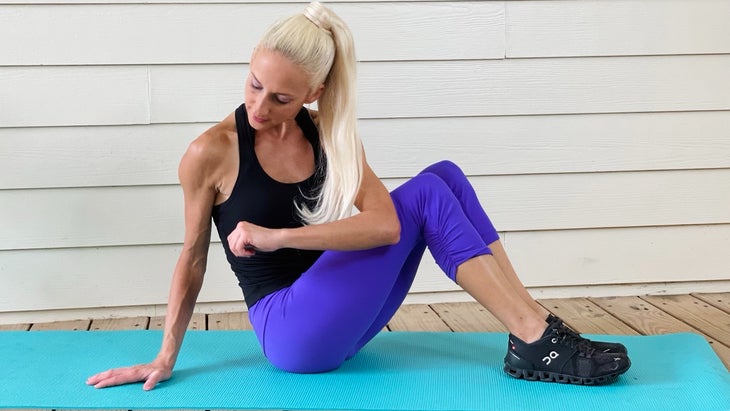
Sit on a mat or the floor with both of your legs bent to slightly less than 90 degrees. Maintain a neutral spine as you gently twist to one side, placing the back of the opposite arm against the leg you’re twisting toward. Breathe deeply in this position, and make sure you only twist as far as you can while keeping good posture.
Pigeon Stretch
Begin in a runner’s lunge, with your forward knee and ankle aligned and your back leg straight out. Move your front foot slowly toward the opposite side, then allow both your back leg and front shin to lower to the floor. Your front leg should fall outward. Keep your torso up and your hips facing forward.
If you feel pain or stiffness in the groin during the FADIR assessment, your body is telling you that your hip needs to learn to glide away from the midline and back within its socket. Helpful mobility drills and stretches include the diagonal banded quad rock and side banded kneeling:
Diagonal Banded Quad Rock
Set up a resistance band around a sturdy anchor close to the floor. While facing away from the anchor point, loop the band around one hip. Angle yourself slightly diagonal to the anchor point, with the band pulling outward from your leg. Gently rock back and forth in this position, but feel free to stop at any point that feels good for you.
Side Banded Kneeling

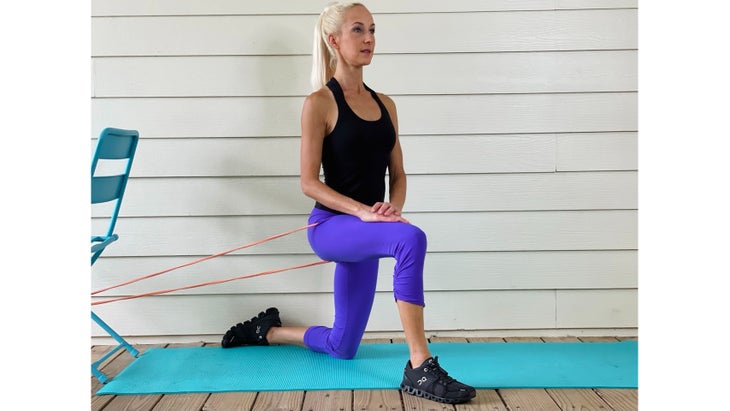
Anchor a resistance band at a point close to the floor, wrapping the band around one leg. Slowly lower yourself into a kneeling position, with your free leg perpendicular to the floor and your banded hip parallel to the floor. Gently move back and forth in this position, focusing on areas where you feel a release.
If you have groin pain or stiffness during the FADIR assessment, steer clear of drills that drive the top of the thigh bone toward the front of the hip socket, such as band-assisted hip flexor stretches or face-down stretches such as figure four, frog, and goalie butterfly. Also avoid drills that compress the hip socket, including figure four seated in a chair and the Z sit, both of which are compression drills.
Next steps
After identifying the drills and stretches that are likely to work for you, fill in the details to complete your daily hip mobility plan.
- Frequency: Stretch or move through the desired motion daily to increase and maintain new ranges of motion.
- Intensity: Perform these stretches and exercises at an intensity of three to seven out of 10. More intensity is not better and will only signal your nervous system to limit the motion further.
- Duration: Perform the moves for 30 seconds each, and perform four sets of each stretch for the greatest benefit. Remember to breathe and relax into each motion. Try to feel your joints relax as you allow your muscles to lengthen.
- Type of exercise: Static stretching can help, but some people respond better to dynamic movement. The above exercises include a mix of stretches that can be done with or without movement, so try both and see which works for you.
- Timing: Dynamic stretches and mobility drills can be done pre- and/or post-workout. When doing any static stretches for more than one set of 30 seconds, perform them after your workout. Prolonged static stretching prior to a workout may decrease your power, speed, and your nervous system’s reaction time during sports.
After you perform your stretching or mobility drills, gently retest the movement that was previously limited. If you see immediate improvement, you’ve found a new mobility drill or stretch for your daily toolbox. Embrace your new drills on most days of the week for a month.
Once you start using your newfound ranges of motion during exercise and everyday life your body will retain the motion. The key is to use the new motions—even if it’s just a few degrees of motion—in other exercises. When it comes to mobility, you either use it or lose it.
RELATED: A Simple Mobility Routine for Happy Joints
If you continue to feel restrictions when you retest, embrace your findings. The continued limitation may be an individual structural limit—especially if you felt groin area pinching during the FABER and FADIR assessments.
If that structural limit is a continued source of fitness frustration, consult with a sports medicine provider to find the underlying cause. Sometimes it may be altered with skilled physical therapy, chiropractic care, massage, acupuncture, or other therapies. Other times, the underlying cause may be a bony structure. This is where sports medicine providers can offer specific insight to help you further individualize your hip mobility efforts.
Remember that respecting your structural limits is not accepting defeat. Instead, learning and respecting your limits provides a chance to explore sustainable fitness movements that will support your health for years to come.
Meredith Butulis, DPT, PT, CSCS is a licensed sport and orthopedic physical therapist, certified exercise physiologist, strength and conditioning coach, personal trainer and yoga/Pilates instructor practicing since 1998. She is the creator of the ISSA Fitness Comeback Coaching Certification, author of the Mobility | Stability Equation books, and host of The Fitness Comeback Coaching podcast.